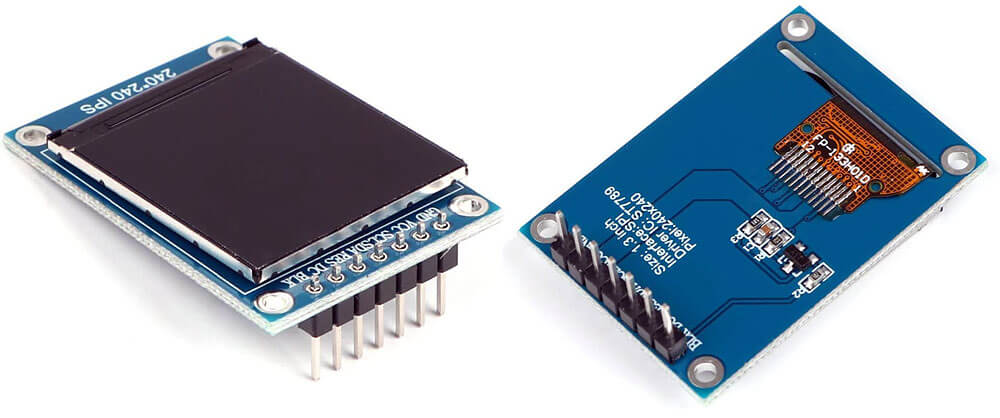
| Typ: | IPS |
|---|---|
| Größe: | 1,3 Zoll (23,4×23,4 mm) |
| Treiberchip: | ST7789 |
| Auflösung: | 240×240 Pixel |
| Pixelabstand (dot pitch): | 0,0975 mm |
| Farbraum: | RGB (65536 Farben) |
| Schnittstelle: | SPI |
| Betriebsspannung: | 3,3V |
| Betriebstemperatur: | -10°C bis ca. 60°C |
| Gewicht: | 9g |
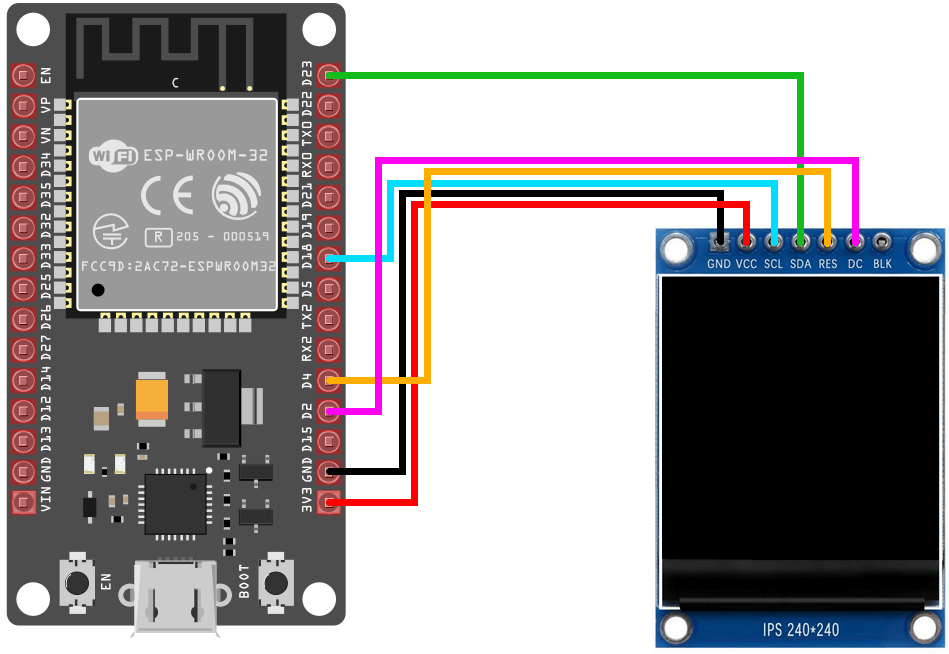
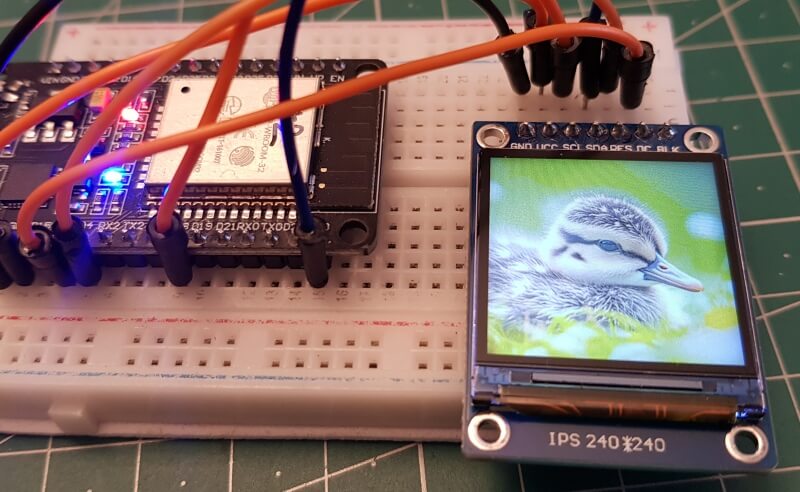
| TFT-Modul | Bedeutung | ESP32 |
|---|---|---|
| GND | Masse/0V | GND |
| VCC | Betriebsspannung | 3V3 |
| SCL | Serial Clock | D18 |
| SDA | Serial Data | D23 |
| RES | Reset | D4 |
| DC | Data/Command | D2 |
| BLK | Hintergrundbeleuchtung | - |
Für die folgenden Sketches wird die Library Bodmer/TFT_eSPI verwendet, die zunächst auf die Bedürfnisse der Programme vorbereitet werden muss:
TFT_eSPI_Setups angelegt.
Setup24_ST7789_ESP32.h mit folgendem Inhalt erstellt:
#define USER_SETUP_ID 24

#define ST7789_DRIVER

#define TFT_WIDTH  240
#define TFT_HEIGHT 240

// Generic ESP32 setup
#define TFT_MISO -1 // Not connected
#define TFT_MOSI 23
#define TFT_SCLK 18
#define TFT_CS   -1 // Not connected
#define TFT_DC    2
#define TFT_RST   4

#define LOAD_GLCD
#define LOAD_FONT2
#define LOAD_FONT4
#define LOAD_FONT6
#define LOAD_FONT7
#define LOAD_FONT8
#define LOAD_GFXFF
#define SMOOTH_FONT

#define SPI_FREQUENCY       40000000
#define SPI_READ_FREQUENCY  20000000
#define SPI_TOUCH_FREQUENCY 2500000User_Setup_Select.h im originalen Library-Ordner
(\Documents\Arduino\libraries\TFT_eSPI) editiert und folgender Inhalt geändert:
// Only ONE line below should be uncommented to define your setup.  Add extra lines and files as needed.

#include <../TFT_eSPI_Setups/Setup24_ST7789_ESP32.h>
//#include <User_Setup.h>           // Default setup is root library folder
#include <SPI.h>
#include <TFT_eSPI.h>
TFT_eSPI tft = TFT_eSPI();
void setup()
{
tft.init();
delay(2000);
}
void loop()
{
tft.invertDisplay(false);
displayDemo();
tft.invertDisplay(true);
displayDemo();
}
void displayDemo()
{
tft.fillScreen(TFT_BLACK);
// Set "cursor" at top left corner of display (0,0) and select font #3
tft.setCursor(0, 0, 4);
// Set the font colour to be white with a black background
tft.setTextColor(TFT_WHITE, TFT_BLACK);
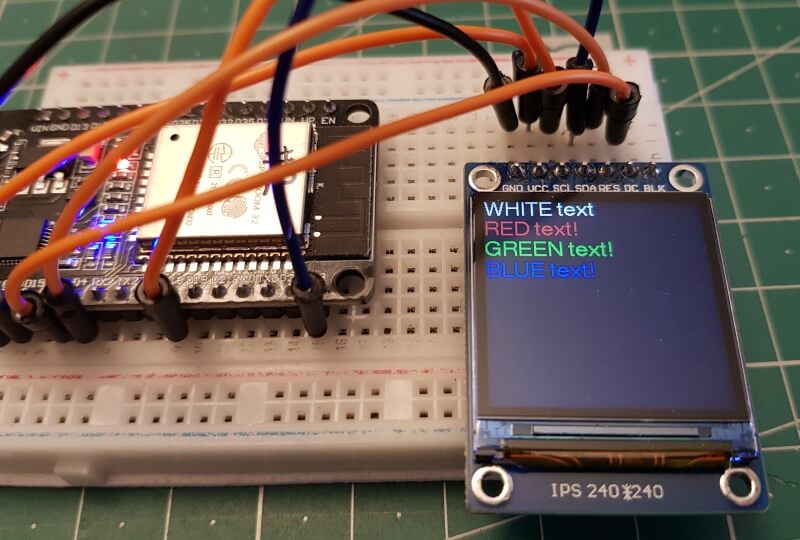
tft.println("WHITE text");
tft.setTextColor(TFT_RED, TFT_BLACK);
tft.println("RED text!");
tft.setTextColor(TFT_GREEN, TFT_BLACK);
tft.println("GREEN text!");
tft.setTextColor(TFT_BLUE, TFT_BLACK);
tft.println("BLUE text!");
delay(5000);
}
#include <TFT_eSPI.h>

TFT_eSPI tft = TFT_eSPI();

void setup()
{
  tft.init();
  tft.fillScreen(TFT_BLACK);

  // Create the outer ring colours
  uint16_t colors[12];
  for (uint8_t c = 0; c < 2; c++) {
    colors[c + 10] = tft.alphaBlend(128 + c * 127, TFT_RED,     TFT_MAGENTA);
    colors[c +  8] = tft.alphaBlend(128 + c * 127, TFT_MAGENTA, TFT_BLUE);
    colors[c +  6] = tft.alphaBlend(128 + c * 127, TFT_BLUE,    TFT_GREEN);
    colors[c +  4] = tft.alphaBlend(128 + c * 127, TFT_GREEN,   TFT_YELLOW);
    colors[c +  2] = tft.alphaBlend(128 + c * 127, TFT_YELLOW,  TFT_ORANGE);
    colors[c +  0] = tft.alphaBlend(128 + c * 127, TFT_ORANGE,  TFT_RED);
  }

  uint16_t rDelta = (tft.width() - 1) / 10;
  uint16_t x = tft.width() / 2;
  uint16_t y = tft.height() / 2;
  bool smooth = true;

  // Draw rings as a series of arcs, increasingly blend colour with white towards middle
  for (uint16_t i = 5; i > 0; i--) {
    for (uint16_t angle = 0; angle <= 330; angle += 30) {
      uint16_t radius = i * rDelta;
      uint16_t wheelColor = tft.alphaBlend((i * 255.0) / 5.0, colors[angle / 30], TFT_WHITE);
      tft.drawArc(x, y, radius, radius - rDelta, angle, angle + 30, wheelColor, TFT_BLACK, smooth);
    }
    smooth = false;  // Only outer ring is smooth
  }
}

void loop() {}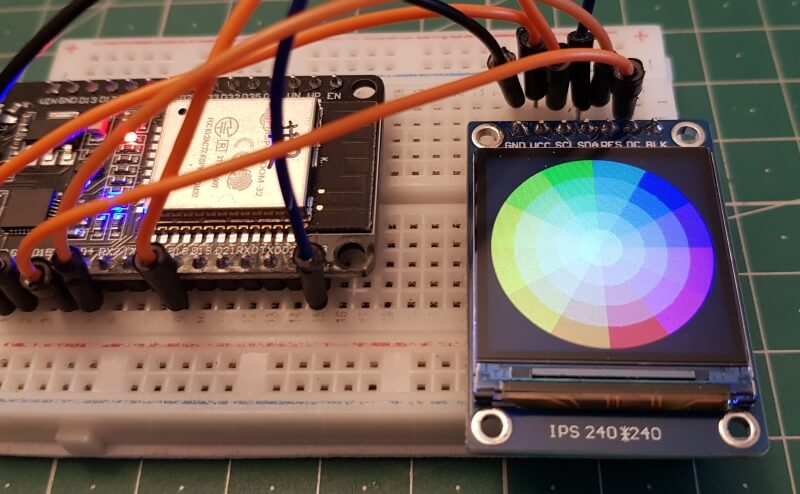
Um ein (PNG-)Bild auf dem TFT-Modul anzeigen zu können, muss dieses zunächst in eine header-Datei umgewandelt werden. Dafür kann man beispielsweise den Konverter https://notisrac.github.io/FileToCArray verwenden. Zum Unwandeln sind folgende Schritte notwendig:
Ich habe die folgenden beiden Bilder von Pixabay verwendet, sie auf 240x240 Pixel verkleinert/beschnitten und sie dann laut den o.g. Anweisungen in header-Dateien umgewandelt:

Im folgenden Sketch müssen dann noch ein paar Anpassungen vorgenommen werden:
#include "duck_photo.h"
int16_t rc = png.openFLASH((uint8_t *)duck_photo, sizeof(duck_photo), pngDraw);
MAX_IMAGE_WIDTH 240
#define MAX_IMAGE_WIDTH 240

#include <SPI.h>
#include <TFT_eSPI.h>
#include <PNGdec.h>
#include "duck_photo.h"

TFT_eSPI tft = TFT_eSPI();
PNG png;

void setup()
{
   tft.begin();
   tft.fillScreen(TFT_BLACK);

   int16_t rc = png.openFLASH((uint8_t *)duck_photo, sizeof(duck_photo), pngDraw);
   if (rc == PNG_SUCCESS) {
      tft.startWrite();
      rc = png.decode(NULL, 0);
      tft.endWrite();
   }
}

void loop() {}

/**
 * This callback function will be called during decoding
 * of the png file to render each image line to the TFT.
 * If you use a different TFT library you will need to
 * adapt this function to suit.
 */
void pngDraw(PNGDRAW *pDraw)
{
   static int16_t xpos = 0, ypos = 0;
   uint16_t lineBuffer[MAX_IMAGE_WIDTH];
   png.getLineAsRGB565(pDraw, lineBuffer, PNG_RGB565_BIG_ENDIAN, 0xffffffff);
   tft.pushImage(xpos, ypos + pDraw->y, pDraw->iWidth, 1, lineBuffer);
}
#include <TFT_eSPI.h>

TFT_eSPI tft = TFT_eSPI();
TFT_eSprite stext = TFT_eSprite(&tft);

void setup()
{
   tft.init();
   tft.fillScreen(TFT_BLACK);

   stext.setColorDepth(8);
   stext.createSprite(80, 16);
   stext.fillSprite(TFT_BLACK);
   stext.setScrollRect(0, 0, 80, 16, TFT_BLACK);
   stext.setTextColor(TFT_WHITE);
}

void loop()
{
   static int tcount = 0;
   stext.pushSprite(0, 0);
   delay(25);
   stext.scroll(1, 0);

   tcount--;
   if (tcount <= 0) {
      tcount = 80;
      stext.drawString("Hello World", 0, 0, 2);
   }
}