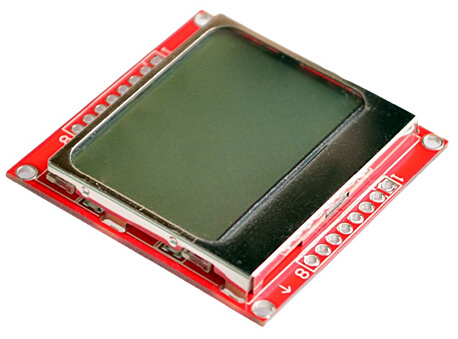
Betriebsspannung des LCD-Modul prüfen!
Normalerweise haben die Nokia 5110 LCD-Module eine Betriebsspannung von 3,3V und können daher nicht direkt
an die Pins des Arduino angeschlossen werden, daher ist entweder ein
Bidirektionaler Pegelwandler notwendig oder man schaltet Widerstände
dazwischen. Mein Modul hatte allerdings Probleme überhaupt etwas anzuzeigen, nachdem ich den Pegelwandler
dazwischen geschaltet habe, daher entschloss ich mich nach mehreren vergeblichen Versuchen die Pins direkt
vom Arduino in das LCD-Modul einzuspeisen und es lief perfekt. Für VCC habe ich 3,3V verwendet.
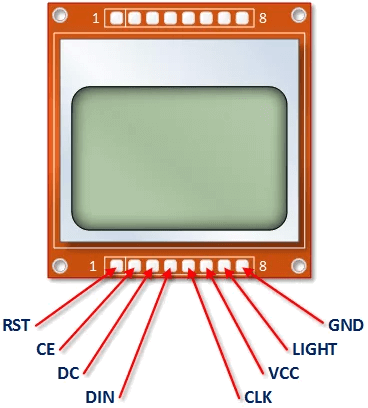
| Pin Nr. | Pin | Funktion | Arduino Pin |
|---|---|---|---|
| 1 | RST | Reset (active low) | D6 |
| 2 | CE (SCE) | Chip select (active low) | D7 |
| 3 | DC (D/C) |
Mode select: 1. command mode (LOW) 2. data mode (HIGH) |
D5 |
| 4 | DIN (DN / MOSI) | Serial data in | D11 (festgelegt) |
| 5 | CLK (SCLK) | Serial clock | D13 (festgelegt) |
| 6 | VCC | Stromversorgung (2,7V bis 3,3V) | VCC 3,3V |
| 7 | LIGHT (LED / BL) | Hintergrundbeleuchtung (max. 3,3V) | Entweder 3,3V oder Pin 8 mit 330Ω Vorwiderstand bzw. Potentiometer |
| 8 | GND | Masse | GND |
Der folgende Sketch verwendet die Library Adafruit_PCD8544.h und Adafruit_GFX.h zur Ansteuerung des LCDs.
#include <SPI.h>
#include <Adafruit_GFX.h>
#include <Adafruit_PCD8544.h>

#define PIN_CLK 13
#define PIN_DIN 11
#define PIN_DC  5
#define PIN_CS  7
#define PIN_RST 6

#define DISPLAY_WIDTH  84
#define DISPLAY_HEIGHT 84

Adafruit_PCD8544 display = Adafruit_PCD8544(PIN_CLK, PIN_DIN, PIN_DC, PIN_CS, PIN_RST);

void setup()
{
    randomSeed(analogRead(0));
    display.begin();

    // adapt display contrast for the best viewing
    display.setContrast(60);

    display.display();       // show splashscreen
    delay(2000);
    display.clearDisplay();  // clears the screen and buffer

    // draw some random pixels
    for (byte y=0; y<DISPLAY_HEIGHT; y++) {
        for (byte x=0; x<DISPLAY_WIDTH; x++) {
            if (random(0, 100) < 30) {
                display.drawPixel(x, y, BLACK);
            }
        }
    }
    display.display();
    delay(5000);
    display.clearDisplay();


    // text display tests
    display.setTextSize(1);
    display.setTextColor(BLACK);
    display.setCursor(0,0);
    display.println("Hello, world!");
    display.setTextColor(WHITE, BLACK);  // inverted text
    display.println(3.141592);
    display.setTextSize(2);
    display.setTextColor(BLACK);
    display.print("0x"); display.println(0xDEADBEEF, HEX);
    display.display();
    delay(5000);

    // rotation example
    display.clearDisplay();
    display.setRotation(1);  // rotate 90 degrees counter clockwise
    display.setTextSize(1);
    display.setTextColor(BLACK);
    display.setCursor(0,0);
    display.println("Rotation");
    display.setTextSize(2);
    display.println("Example!");
    display.display();
    delay(5000);

    display.setRotation(0); // revert back to no rotation
}

void loop()
{
}In diesem Versuch wird die Library U8glib verwendet, um das LCD anzusteuern.
#include "U8glib.h"

// CLK=13, DIN=11, CE=7, DC=5, RST=6
U8GLIB_PCD8544 u8g(13, 11, 7, 5, 6);

const uint8_t rook[] U8G_PROGMEM = {
    0x00,   // 00000000
    0x55,   // 01010101
    0x7f,   // 01111111
    0x3e,   // 00111110
    0x3e,   // 00111110
    0x3e,   // 00111110
    0x3e,   // 00111110
    0x7f    // 01111111
};

void draw(void)
{
    u8g.drawBitmapP( 0, 0, 1, 8, rook);

    u8g.setFont(u8g_font_profont11);    // select font
    u8g.drawStr(0, 25, "Hello world!"); // put string of display at position X, Y
}

void setup(void)
{
}

void loop(void)
{
    u8g.firstPage();
    do {
        draw();
    } while( u8g.nextPage() );
    delay(5000);
}Dieser Versuch verwendet die Library Nokia 5110 LCD library zur Ansteuerung des LCDs
#include <Nokia_LCD.h>

// bitmap with vertically oriented bytes
const unsigned char rook[8] PROGMEM = {
    0x00,   // 00000000
    0x55,   // 01010101
    0x7f,   // 01111111
    0x3e,   // 00111110
    0x3e,   // 00111110
    0x3e,   // 00111110
    0x3e,   // 00111110
    0x7f    // 01111111
};

// CLK=13, DIN=11, DC=5, CE=7, RST=6
Nokia_LCD lcd(13, 11, 5, 7, 6);

void setup()
{
    lcd.begin(); // initialize the screen
    lcd.setContrast(60);  // good values are usualy between 40 and 60

    lcd.clear(false); // clear the screen
    delay(2000);

    // draw the bitmap on your screen
    lcd.draw(rook, sizeof(rook) / sizeof(rook[0]), true);

    // Set the cursor on the beginning of the 5th row
    lcd.setCursor(0, 4);
    lcd.print("Hello world!");
}

void loop()
{
}