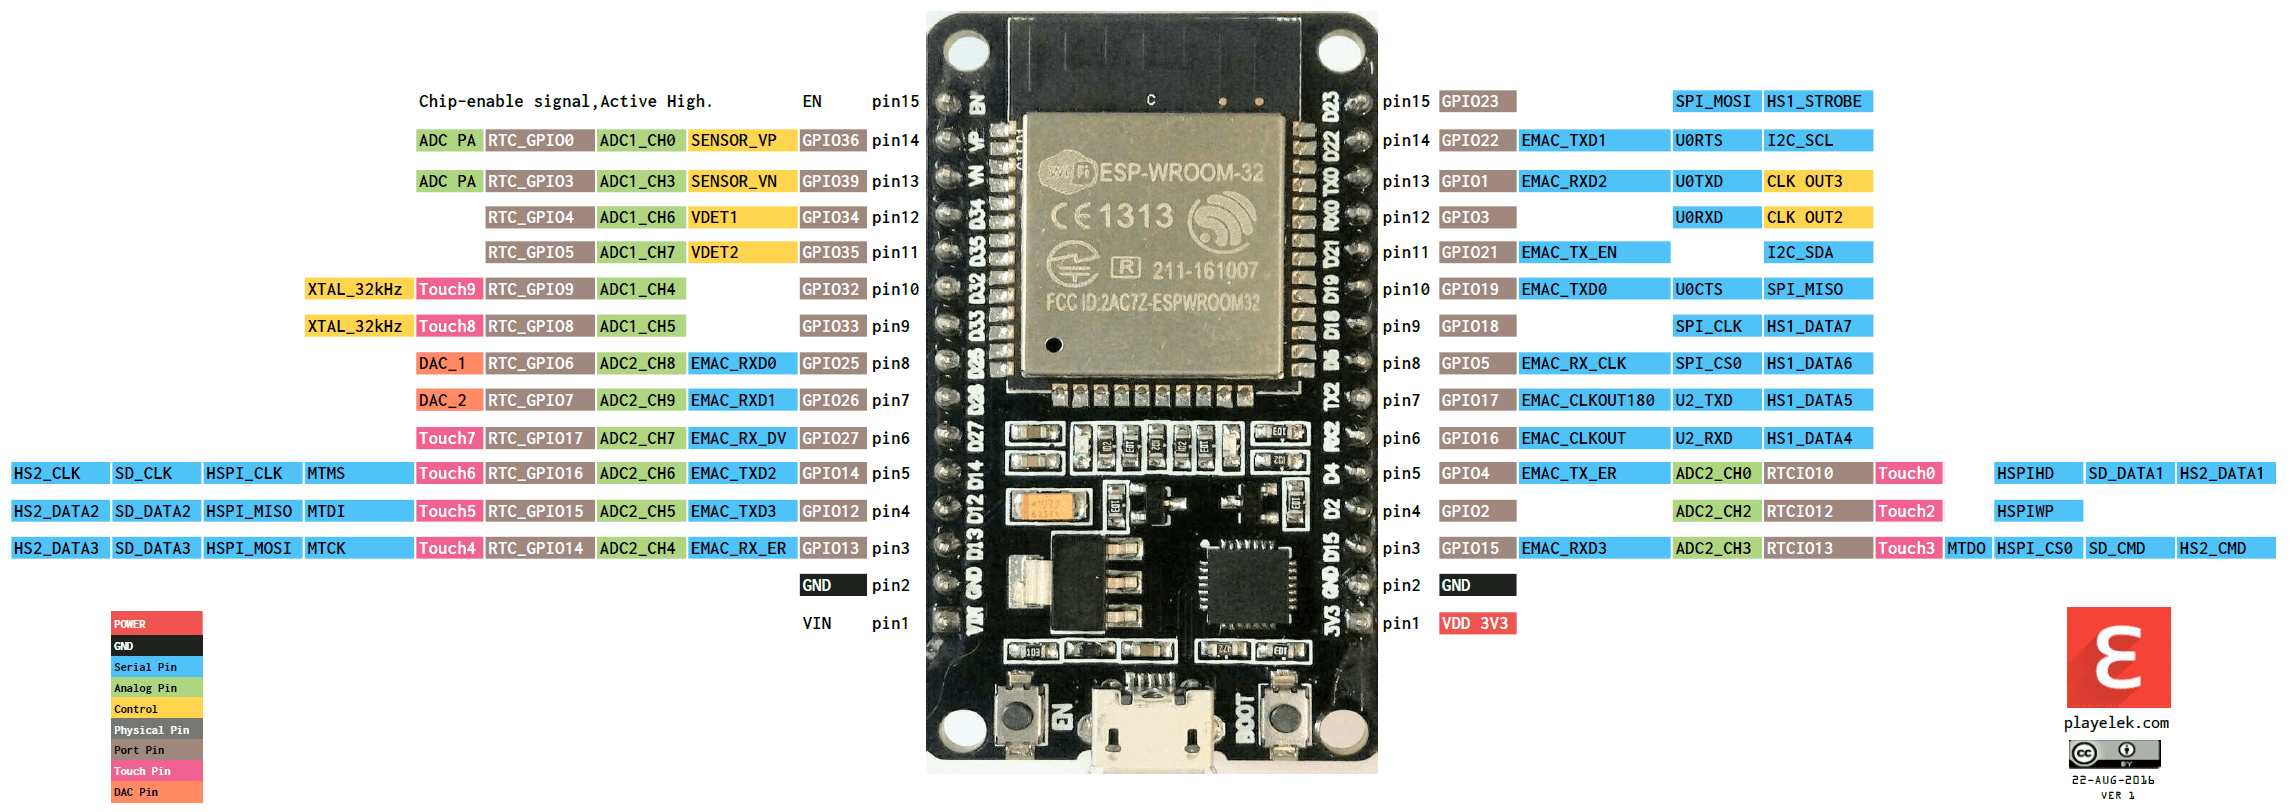
In den folgenden Experimenten wurde ein ESP32 DEVKIT V1 mit 30 GPIO-Anschlüssen verwendet.

Um Sketches mit der Arduino-IDE für den ESP32 kompilieren und hochladen zu können müssen zunächst
einige Vorbereitungen getroffen werden.
Man fügt unter "Voreinstellungen → Zusätzliche Boardverwalter-URLs" folgende URL hinzu:
https://dl.espressif.com/dl/package_esp32_index.json.
Falls schon eine andere URL
in diesem Feld steht, kann diese mit einem Komma separiert werden:

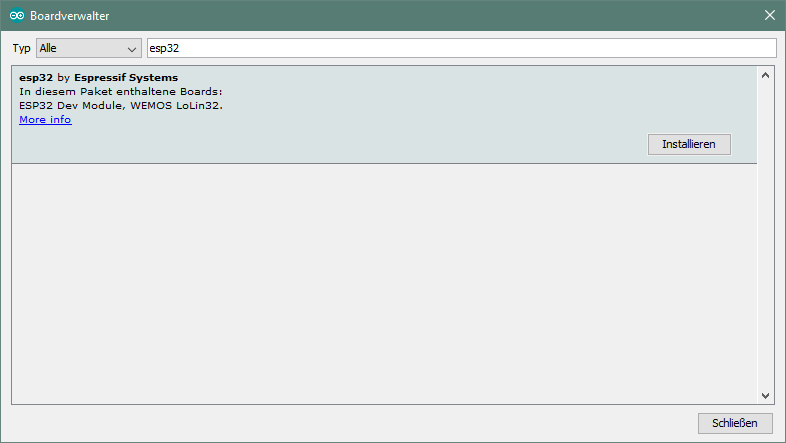
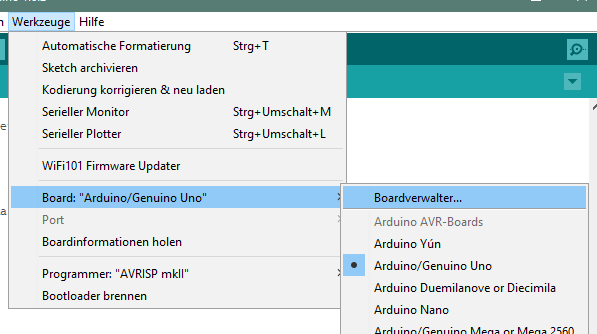
Als nächste muss das ESP32 Board hinzugefügt werden. Dazu geht man unter "Werkzeuge → Boards → Boardverwalter":
Hier sucht man nach "esp" und installiert dann "ESP32 von Espressif".
Unter Linux muss noch "Python serial" installiert werden: apt-get install python-serial.
Im Menu "Werkzeuge → Board:" sollte nun das Board "DOIT ESP32 DEVKIT V1" ausgewählt werden. (abhängig vom verwendeten Board)
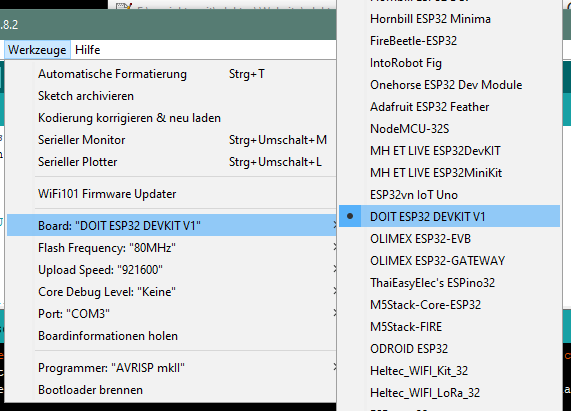
Nun kann der ESP32 an den USB-Port des PC angesteckt werden und man wählt nun den Port aus
im Menu "Werkzeuge → Port:".
Falls unter Windows der COM Port nicht wählbar ist, muss noch zusätzlich die
USB to UART Bridge installiert werden.
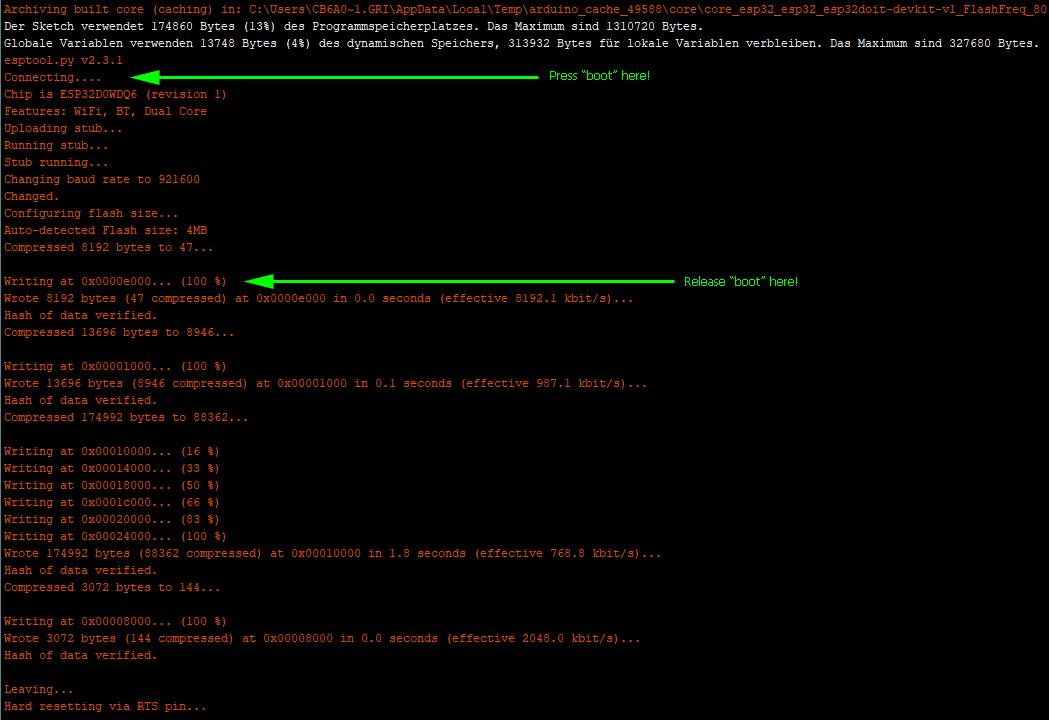
Nun kann ein Sketch in der Arduino-IDE geladen und kompiliert werden. Beim Hochladen auf den ESP32 ist zu beachten, dass der Mikrotaster "Boot" auf dem ESP32-Board gedrückt werden muss, sobald in der Arduino-Ausgabe-Konsole (nicht serielle Konsole!) so etwas wie "Connecting...." erscheint. Wenn der Vorgang dann weitergeht ("Writing at...."), kann der Mikrotaster wieder losgelassen werden. Der Ladevorgang wird dann weitergeführt und abgeschlossen.
Dieser simple Versuch soll nur die prinzipielle Funktion und Programmierfähigkeit des ESP32-Boards ausprobieren. Es soll die eingebaute SMD-LED im Sekundentakt blinken.
#define BLINK_DELAY 1000

void setup()
{
    pinMode(LED_BUILTIN, OUTPUT);
}

void loop()
{
    digitalWrite(LED_BUILTIN, HIGH);
    delay(BLINK_DELAY);
    digitalWrite(LED_BUILTIN, LOW);
    delay(BLINK_DELAY);
}
In diesem Versuch sollen zwei LEDs abwechselnd blinken.
#define BLINK_DELAY 300

#define PIN_LED_1 12 // GPIO12
#define PIN_LED_2 14 // GPIO14

void setup()
{
    pinMode(PIN_LED_1, OUTPUT);
    pinMode(PIN_LED_2, OUTPUT);
}

void loop()
{
    digitalWrite(PIN_LED_1, HIGH);
    digitalWrite(PIN_LED_2, LOW);
    delay(BLINK_DELAY);

    digitalWrite(PIN_LED_1, LOW);
    digitalWrite(PIN_LED_2, HIGH);
    delay(BLINK_DELAY);
}
In diesem Versuch soll sich der ESP32 mit einem lokalen WLAN (WiFi) verbinden und über dieses Netzwerk eine
UDP-Anfrage an einen Server im Internet absenden.
Im Sketch müssen die eigenen Zugangsdaten für das WLAN angepasst werden, sowie die IP und der Port des zu
verbindenden Servers.
#include <WiFi.h>
#include <WiFiUdp.h>

// WiFi settings:
const char* wifiSSID     = "mySSID";
const char* wifiPassword = "myPassword";

// IP address and port to send UDP data to:
const char * udpAddress = "127.0.0.1";
const int udpPort       = 12345;

WiFiUDP udp;

void setup()
{
    Serial.begin(9600);
    while (!Serial); // wait for USB serial
}

void loop()
{
    if (WiFi.status() != WL_CONNECTED) {
        connectWiFi();
    }

    Serial.print("Sending UDP packet to "+String(udpAddress) + ":"+String(udpPort)+"...");
    udp.begin(WiFi.localIP(), udpPort);
    udp.beginPacket(udpAddress, udpPort);
    udp.printf("{\"key\": \"esp32Trigger\", \"value\": 25}");
    udp.endPacket();
    Serial.println("[ok]");

    delay(10000);
}

void connectWiFi()
{
    Serial.print("Connecting to WiFi...");
    WiFi.begin(wifiSSID, wifiPassword);
    while (WiFi.status() != WL_CONNECTED){
        delay(500);
        Serial.print(".");
    }
    Serial.println("[ok]");
}In diesem Versuch verbindet sich der ESP32 ebenfalls wieder mit einem lokalen WLAN und sendet dann eine HTTP-Anfrage an einen Webserver im Internet und gibt die als Response empfangenen Daten in der seriellen Konsole aus.
#include <WiFi.h>
#include <HTTPClient.h>

// WiFi settings:
const char* wifiSSID     = "mySSID";
const char* wifiPassword = "myPassword";

HTTPClient http;

void setup()
{
    Serial.begin(9600);
    while (!Serial); // wait for USB serial
}

void loop()
{
    if (WiFi.status() != WL_CONNECTED) {
        connectWiFi();
    }

    http.begin("http://turanis.de/?id=10");

    // Make the request
    int httpCode = http.GET();
    if (httpCode > 0) {
        String payload = http.getString();
        Serial.println(httpCode);
        Serial.println(payload);
    } else {
        Serial.println("Error on HTTP request");
    }
    http.end(); // Free the resources

    delay(10000);
}

void connectWiFi()
{
    Serial.print("Connecting to WiFi...");
    WiFi.begin(wifiSSID, wifiPassword);
    while (WiFi.status() != WL_CONNECTED){
        delay(500);
        Serial.print(".");
    }
    Serial.println("[ok]");
}In diesem Versuch verbindet sich der ESP32 ebenfalls wieder mit einem lokalen WLAN und fragt dann einen NTP-Service im Internet an. Das Resultat (=aktuelle Zeit) wird in der seriellen Konsole ausgegeben.
#include <NTPClient.h>
#include <WiFi.h>
#include <WiFiUdp.h>

// WiFi settings:
const char* wifiSSID     = "mySSID";
const char* wifiPassword = "myPassword";

// By default 'pool.ntp.org' is used with 60 seconds update interval and no offset
// You can specify the time server pool and the offset, (in seconds)
// additionaly you can specify the update interval (in milliseconds).
// NTPClient timeClient(ntpUDP, "europe.pool.ntp.org", 3600, 60000);
NTPClient timeClient(ntpUDP);
WiFiUDP ntpUDP;

void setup()
{
    Serial.begin(9600);
    while (!Serial); // wait for USB serial

    WiFi.begin(wifiSSID, wifiPassword);
    while(WiFi.status() != WL_CONNECTED) {
        delay(500);
        Serial.print(".");
    }

    timeClient.begin();
}

void loop()
{
    timeClient.update();
    Serial.println(timeClient.getFormattedTime());
    delay(1000);
}Bei diesem Versuch verbindet sich der ESP32 auch wieder mit einem lokalen WLAN, aber dieses Mal stellt er dann einen eigenen Webserver zur Verfügung, der innerhalb dieses Netzwerkes verfügbar ist.
#include <WiFi.h>

// WiFi settings:
const char* wifiSSID     = "mySSID";
const char* wifiPassword = "myPassword";

WiFiServer server(80); // Set port to 80
String header;

void setup()
{
    Serial.begin(9600);

    Serial.println("Connecting to " + String(wifiSSID));
    WiFi.begin(wifiSSID, wifiPassword);
    while (WiFi.status() != WL_CONNECTED) {
        delay(500);
        Serial.print(".");
    }
    Serial.println("[ok]");

    Serial.print("IP address: ");
    Serial.println(WiFi.localIP());

    server.begin();
}

void loop()
{
  WiFiClient client = server.available();   // Listen for incoming clients

  if (client) {                             // If a new client connects,
    Serial.println("New Client.");          // print a message out in the serial port
    String currentLine = "";                // make a String to hold incoming data from the client
    while (client.connected()) {            // loop while the client's connected
      if (client.available()) {             // if there's bytes to read from the client,
        char c = client.read();             // read a byte, then
        Serial.write(c);                    // print it out the serial monitor
        header += c;
        if (c == '\n') {                    // if the byte is a newline character
          // if the current line is blank, you got two newline characters in a row.
          // that's the end of the client HTTP request, so send a response:
          if (currentLine.length() == 0) {
            // HTTP headers always start with a response code (e.g. HTTP/1.1 200 OK)
            // and a content-type so the client knows what's coming, then a blank line:
            client.println("HTTP/1.1 200 OK");
            client.println("Content-type:text/html");
            client.println("Connection: close");
            client.println();

            // React on user input from the client
            if (header.indexOf("GET /on") >= 0) {
              Serial.println("Set to ON");
            } else if (header.indexOf("GET /off") >= 0) {
              Serial.println("Set to OFF");
            }

            // Display the HTML web page
            client.println("<!DOCTYPE html><html>");
            client.println("<head><meta name=\"viewport\" content=\"width=device-width, initial-scale=1\">");
            client.println("<link rel=\"icon\" href=\"data:,\">");
            client.println("</head>");
            client.println("<body><h1>ESP32 Web Server</h1>");
            client.println("<p><a href=\"/on\">ON</a></p>");
            client.println("<p><a href=\"/off\">OFF</a></p>");
            client.println("</body></html>");

            // The HTTP response ends with another blank line
            client.println();

            break;
          } else { // if you got a newline, then clear currentLine
            currentLine = "";
          }
        } else if (c != '\r') {
          currentLine += c;      // add it to the end of the currentLine
        }
      }
    }

    header = "";

    client.stop();
    Serial.println("Client disconnected.");
    Serial.println("");
  }
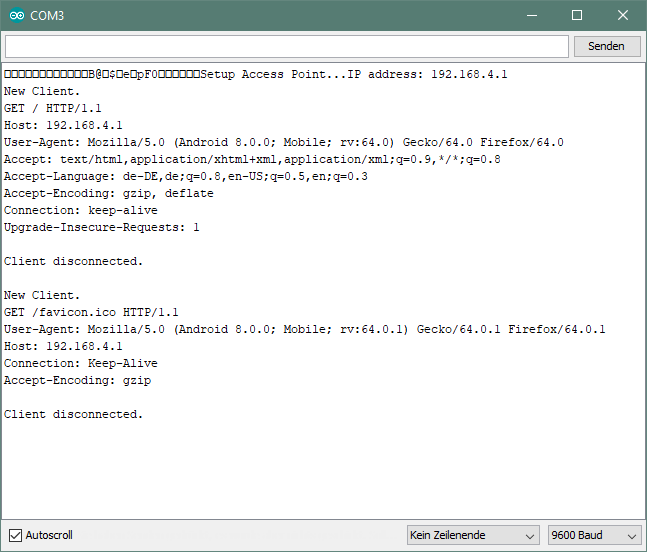
}Hier verbindet sich der ESP32 zu keinem bekannten Netzwerk, sondern erzeugt selbst eines, über welches man sich mit anderen verbinden kann.
#include <WiFi.h>

// Custom WiFi settings:
const char* wifiSSID     = "ESP32-AP";
const char* wifiPassword = "12345";
int wifiChannel = 1;      // Wi-Fi channel number (1-13)
int hideSsid = 0;         // (0 = broadcast SSID, 1 = hide SSID)
int maxConnections = 2;   // maximum simultaneous connected clients (1-4)

WiFiServer server(80); // web server port number: 80
String header;

void setup()
{
  Serial.begin(9600);
  while (!Serial); // wait for USB serial

  Serial.print("Setup Access Point...");
  WiFi.softAP(wifiSSID, wifiPassword, wifiChannel, hideSsid, maxConnections);

  IPAddress IP = WiFi.softAPIP();
  Serial.print("IP address: ");
  Serial.println(IP);

  server.begin();
}

void loop()
{
  WiFiClient client = server.available();   // Listen for incoming clients

  if (client) {                             // If a new client connects,
    Serial.println("New Client.");          // print a message out in the serial port
    String currentLine = "";                // make a String to hold incoming data from the client
    while (client.connected()) {            // loop while the client's connected
      if (client.available()) {             // if there's bytes to read from the client,
        char c = client.read();             // read a byte, then
        Serial.write(c);                    // print it out the serial monitor
        header += c;
        if (c == '\n') {                    // if the byte is a newline character
          // if the current line is blank, you got two newline characters in a row.
          // that's the end of the client HTTP request, so send a response:
          if (currentLine.length() == 0) {
            // HTTP headers always start with a response code (e.g. HTTP/1.1 200 OK)
            // and a content-type so the client knows what's coming, then a blank line:
            client.println("HTTP/1.1 200 OK");
            client.println("Content-type:text/html");
            client.println("Connection: close");
            client.println();

            // Display the HTML web page
            client.println("<!DOCTYPE html>");
            client.println("<html>");
            client.println("<head>");
            client.println("<title>ESP32 Access Point</title>");
            client.println("<meta name=\"viewport\" content=\"width=device-width, initial-scale=1\">");
            client.println("</head>");

            client.println("<body>");
            client.println("<h1>ESP32 Server</h1>");
            client.println("<p>This server is broadcasting with the ESP32 own access point</p>");
            client.println("</body>");
            client.println("</html>");

            // The HTTP response ends with another blank line
            client.println();
            // Break out of the while loop
            break;
          } else { // if you got a newline, then clear currentLine
            currentLine = "";
          }
        } else if (c != '\r') {  // if you got anything else but a carriage return character,
          currentLine += c;      // add it to the end of the currentLine
        }
      }
    }

    // Clear the header variable
    header = "";

    // Close the connection
    client.stop();
    Serial.println("Client disconnected.");
    Serial.println("");
  }
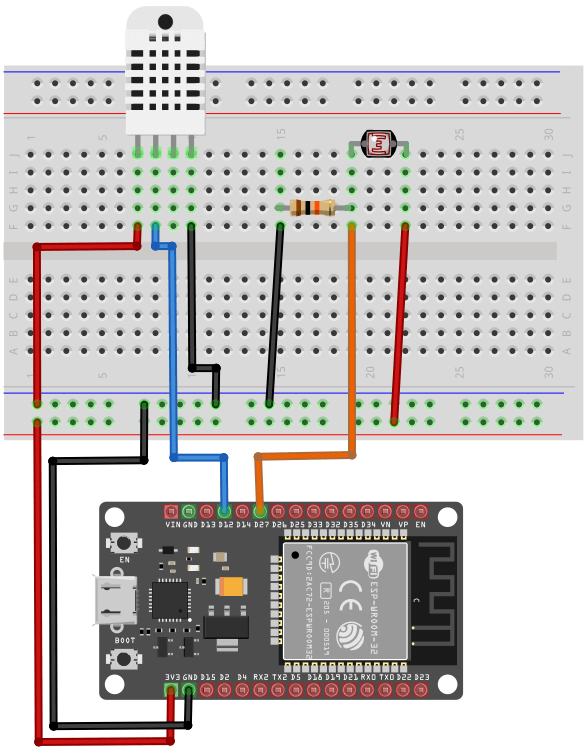
}In diesem Versuch werden Sensordaten eines LDR (Helligkeit) und des DHT22-Fühlers (Temperatur und Luftfeuchte) gemessen und im 10-Sekunden-Takt nach ThingSpeak geschickt. Dort können die über Zeit gesammelten Daten ausgewertet oder weiterverarbeitet werden.

#include <DHTesp.h>
#include <WiFi.h>

// WiFi settings:
const char* wifiSSID     = "mySSID";
const char* wifiPassword = "myPassword";

// ThingSpeak settings:
const char* tsServer    = "api.thingspeak.com";
const char* writeAPIKey = "myWriteApiKey";

#define PIN_DHT22 27
#define PIN_LDR   12

DHTesp dht;
float humidity, temperature;
int brightness;

void setup()
{
    Serial.begin(9600);
    dht.setup(PIN_DHT22, DHTesp::DHT22);
    connectWiFi();
}

void loop()
{
  // In each loop, make sure there is always an internet connection.
  if (WiFi.status() != WL_CONNECTED) {
      connectWiFi();
  }

  brightness = analogRead(PIN_LDR);
  temperature = dht.getTemperature();
  humidity = dht.getHumidity();

  String measureData = "field1=" + String(brightness) + "&field2=" + String(temperature) + "&field3=" + String(humidity);
  httpRequest(measureData);

  delay(10000);
}

void connectWiFi()
{
    WiFi.begin(wifiSSID, wifiPassword);
    while (WiFi.status() != WL_CONNECTED){
        delay(500);
    }
    Serial.println("WiFi connected");
}

/**
 * POST data to ThingSpeak
 */
void httpRequest(String measureData)
{
    WiFiClient client;

    if (!client.connect(tsServer, 80)) {
        Serial.println("connection failed");
    } else {
        if (client.connect(tsServer, 80)) {
            client.println("POST /update HTTP/1.1");
            client.println("Host: " + String(tsServer));
            client.println("Connection: close");
            client.println("User-Agent: ESP32WiFi/1.1");
            client.println("X-THINGSPEAKAPIKEY: " + String(writeAPIKey));
            client.println("Content-Type: application/x-www-form-urlencoded");
            client.print("Content-Length: ");
            client.print(measureData.length());
            client.print("\n\n");
            client.print(measureData);
        }
    }
    client.stop();
}