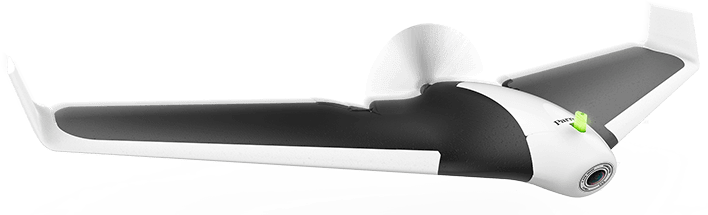
Dieser Beitrag fällt etwas außer der Reihe, denn hier bespreche ich meine Erfahrungen mit der Drohne bzw. dem Nurflügler Parrot Disco des französischen Herstellers Parrot Drones SAS.
| Länge | 1150 mm |
|---|---|
| Breite | 580 mm |
| Höhe | 120 mm |
| Spannweite | 1150 mm |
| Masse (inkl. Batterie | 750 g (26 oz) |
| Höchstgeschwindigkeit | 80 km/h |
| Aktionsradius (Reichweite) | 2000 m |
| Material |
Geschäumtes Polypropylen (EPP) Carbonfaserverstärkter Kunststoff (CFK) |
|---|---|
| Hauptmotor | 1280 kv |
| Hilfsmotoren | 2× 5V-Servos |
| Rechner |
Dual core ARM A9 CPU Interner Flash-Speicher: 32 GByte |
| Übertragung |
Access point network Wi-Fi AC-type, 2× 2,4GHz Antennen (mehrfach Senden und Empfangen) Bis zu 2 km Reichweite mit "Parrot Skycontroller 2" ohne Interferenzen und Hindernisse Optionale Installation von SBUS-, SUMD- oder CPPM-Empfänger möglich Supported Protocols IEEE 802.11ac Wi-Fi Bands 2,4 GHz + 5 GHz |
| Digitale Kamera |
Max. Auflösung: 14 Megapixel
Video-Auflösungen: 1280×720 (720p), 1920×1080 (1080p / Full HD), 640×360 (nHD) Video streaming: 360p/720p |
| Stromversorgung |
2700 mAh / 25 A 3-Zellen 10C LiPo (~45 min. Flugzeit) Maße: 86mm × 30mm × 4,32mm Gewicht: 185g Betriebsspannung: 11,1V Maximale Entladestrom: 21,6 A Maximaler Ladestrom: 3,5 A Standard XT60-Stecker und standard 3S balance port Betriebstemperaturbereich: -20°C bis +60°C Weiter Infos:
|
Das die Disco kein Fahrgestell besitzt, landet sich immer auf dem Korpus, und das kann auf die Dauer zu Beschädigungen an der Unterseite des Flugkörpers führen. Daher habe ich mich entschieden, soviel wie möglich von der Unterseite mit robustem Gewebeband zu verstärken. Man muss dabei nur aufpassen, die Schrauben bzw. die untere Luke für die Höhenmessung freizulassen.
Der mitgelieferte Akku von Parrot bietet mit 2700mAh laut Hersteller eine Flugzeit von 45 Minuten. Doch kann ein Ersatz-Akku oder eine höhere Kapazität die Flugzeit ernorm erhöhen. Dafür kann man natürlich die Original-Akkus von Parrot erwerben, die auf jeden Fall passt. Ich habe mich für den Multistar 3S 3000mAh LiPo als Zweit-Akku entschieden. Dafür musste ich jedoch ein wenig Platz im Inneren des Flugkörpers schaffen. Dies war aber leicht mit einem sehr scharfen Cutter möglich. Somit habe ich nun zwei Akkus mit ca. 40 Minuten Flugzeit!
Es gibt einige Anleitungen, um die Reichweite der Disco enorm zu erhöhen (siehe weiter unten bei den Links). Allerdings habe ich dies nicht probiert, denn es ist in Deutschland nicht erlaubt, ohne Sichtkontakt zu fliegen.
Um die Videos in Garmin VIRB Edit importieren zu können müssen sie umgewandelt werden, z.B. mit VLC-Player (Profil: "Video for MPEG4 1080p TV/device" verwenden)
Auf meinem Smartphone sind die Anweisungen leider nicht gut zu sehen (auf dem Tablet schon), daher
hier nocheinmal in der richtigen Reihenfolge:
- Disco mit der Nase ca. 5s senkrecht nach unten halten (Staudrucksonde wird hierbei kalibriert)
- Disco 360° um die Z-Achse drehen
- Disco 360° um die Y-Achse drehen
- Disco 360° um die X-Achse drehen
Statt des längeren Drückens laut Manual einfach nur den On/Off-Schalter kurz antippen und dann warten.
Kurzes Drücken des On/Off-Schalters und die Disco fährt hoch.
(Vorher backup von Fotos/Videos machen!)
- Drücke zweimal schnell die On/Off-Taste, und halten die Taste ca. 10s lang gedrückt.
- Die On/Off-Taste blinkt orange und rot, bevor die Parrot Disco heruntergefahren wird.
- Schalte die Parrot Disco ein, um den Reset-Vorgang abzuschließen.
- Dabei wird die Firmware wieder zurückgesetzt. (Bei mir auf v1.0.5)
- Alle Einstellungen werden zurückgesetzt und der interne Speicher wird komplett gelöscht.
The app FreeFlight Pro can display error codes to help you understand what happens with the drone. The table here displays the descriptions and recommended actions if available.
| Error # | Description | Details |
|---|---|---|
| 1 | Flight history default | After landing : Flight history may be wrong. |
| 2 | Motor stalled | Flying : The flight calculator tries to reboot automatically. |
| 3 | Motor security |
Flying: The pilot must push gas more than 95% to force the motor to reboot. After landing: The error is cancelled at the next take off. Check whether the motor is obstructed. |
| 4 | Hardware default | Flying: The flight calculator tries to reconnect to the ESC automatically. |
| 5 | Motor power stage problem | Flying: The flight calculator tries to reboot automatically. |
| 9 | Battery tension default | Flying/loitering: The flight calculator resets the battery charge automatically. If the message remains, contact Parrot Customer Service. |
| 10 | Battery balance default | Switching on the drone: Change the battery / contact the retailler or Parrot Customer Service for a diagnostic. |
| 11 | Problem motor phase | Switching on the drone : Check the cables connecting the motor phase, replace the motor if damaged / contact Parrot Customer service if needed. |
You can fly the Parrot Disco with a RC controller (not included); however, auto-assisted flying is not available in this mode.
Parrot Disco is compatible with most current RC controllers and handles the following protocols:
- SBUS: Futaba T6K, T18SZ, T10J,
FrSky Taranis X9D
- SUMD: Graupner MZ10,
MX-16
- CPPM
Install the receiver for your RC controller:
- Open Parrot Disco’s cowling.
- Connect one of the cable to the C.H.U.C.K autopilot unit.
- Connect the other end to the receiver.
- Secure the receiver inside the cowling compartment.
- Close the cowling. Make sure the receiver's antenna is sticking out.
Connecting the RC controller to Parrot Disco:
- Turn on the RC controller.
- Place Parrot Disco on a flat, dry surface.
- Turn on Parrot Disco.
When the on/off button is a steady green, Parrot Disco's GPS is connected.
The C.H.U.C.K. is basically a Unix computer with an ARM core. The OS is very similar to Android, but you can only access it through a shell.
Getting into the shell prompt:
- turn Disco on On firmware > 1.7.0
- double-press the power button; first press is blinks green, second it blinks purple-blue-purple-blue
- connect to Disco's wifi
- telnet to 192.168.41.1
Network ports: 21, 51, 8888(?)
Button presses in firmware 1.7.0:
1 short press: on/off
2 short presses: enable USB network and telnet (purple fast blink)
3 short presses: switch between Parrot Autopilot (with skycontroller/freefligh etc) and Arduplane (https://community.parrot.com/t5/Disco-Knowledge-Base/Arduplane-for-Parrot-Disco/ta-p/154274)
long press: switch to 5Ghz or back to 2.5Ghz (default)
very long press: reset to factory default
Die folgenden Links führen zu externen Seite, deren Inhalte ich nicht unter Kontrolle habe:
Die folgenden Videos stehen nicht unter meiner Kontrolle und sind als Inspiration gedacht:
Die Parrot Disco ist ein schönes Erwachsenen-Spielzeug mit einer recht guten Video-Qualität mit einem ruhigen Bild
und einer angenehm langen Flugzeit. Es macht viel Spaß, dieses Modell zu fliegen!
Ein kleiner Wehmutstropfen ist jedoch der hohe Platzbedarf in der Luft, so dass man sich die geeigneten
Flugorte suchen muss.
Außerdem würde ich auf jeden Fall empfehlen, das Paket
mit dem Rucksack zu kaufen, denn der Karton ist zwar eine gute Verpackung, aber im Gelände extrem unhandlich.